
Recently, a new Internet Service Provider (ISP) became available in my area. Now, no longer confined to a choice between the cable TV company and the telephone company to supply the bits to my house, I had the option of true gigabit fiber to my house as a choice! Needless to say, I had some questions.
The first question was, “How difficult is it to get a static IP address?” I wanted to know this because the cable TV company wanted you to switch from a residential service to a business service and then there was some sort of biological sampling required, signing over your firstborn child and some “feats of strength” required to get one of these magical things. For the new ISP, the answer was simple – send us an email asking for one and it will cost you $10 US per month to keep it. Wow. That was easy. On to the next question.
The next question was the tricky one. My cable TV provider purposely blocked certain ports such as port 25 (SMTP) and there was no way around that. I asked the new ISP if they blocked any ports and the answer was, “No. Why would we do that?” Again – amazing! At this point, I was ready to start moving all of my stuff from the cloud to my house. First things first, I had multiple HTTPS-secured websites to move. Uh oh. How do I serve up multiple websites with multiple different certificates from a single public IP address? Time to test my Google Fu.
Turns out, my OpenBSD 7.1 router could come to the rescue. By doing a reverse-proxy setup with Apache2 and SSL termination, I could accept HTTPS traffic for multiple sites on my single IP address, serve up the right certificate to the browser on the other side of the communication and then pass along the traffic in the clear (HTTP) on port 80 to various servers on my home network. Finding blog posts about this was easy. Making it worked proved to be a bit tricky. I’m sure I could have done this with the OpenBSD httpd daemon (which has a much smaller attack surface that massive old Apache2) but that will be some research and investigation for another post (hopefully) in the future.
OpenBSD Reverse Proxy + SSL Termination
First off, something rare for this blog – a picture! This is the logical traffic flow for my setup:
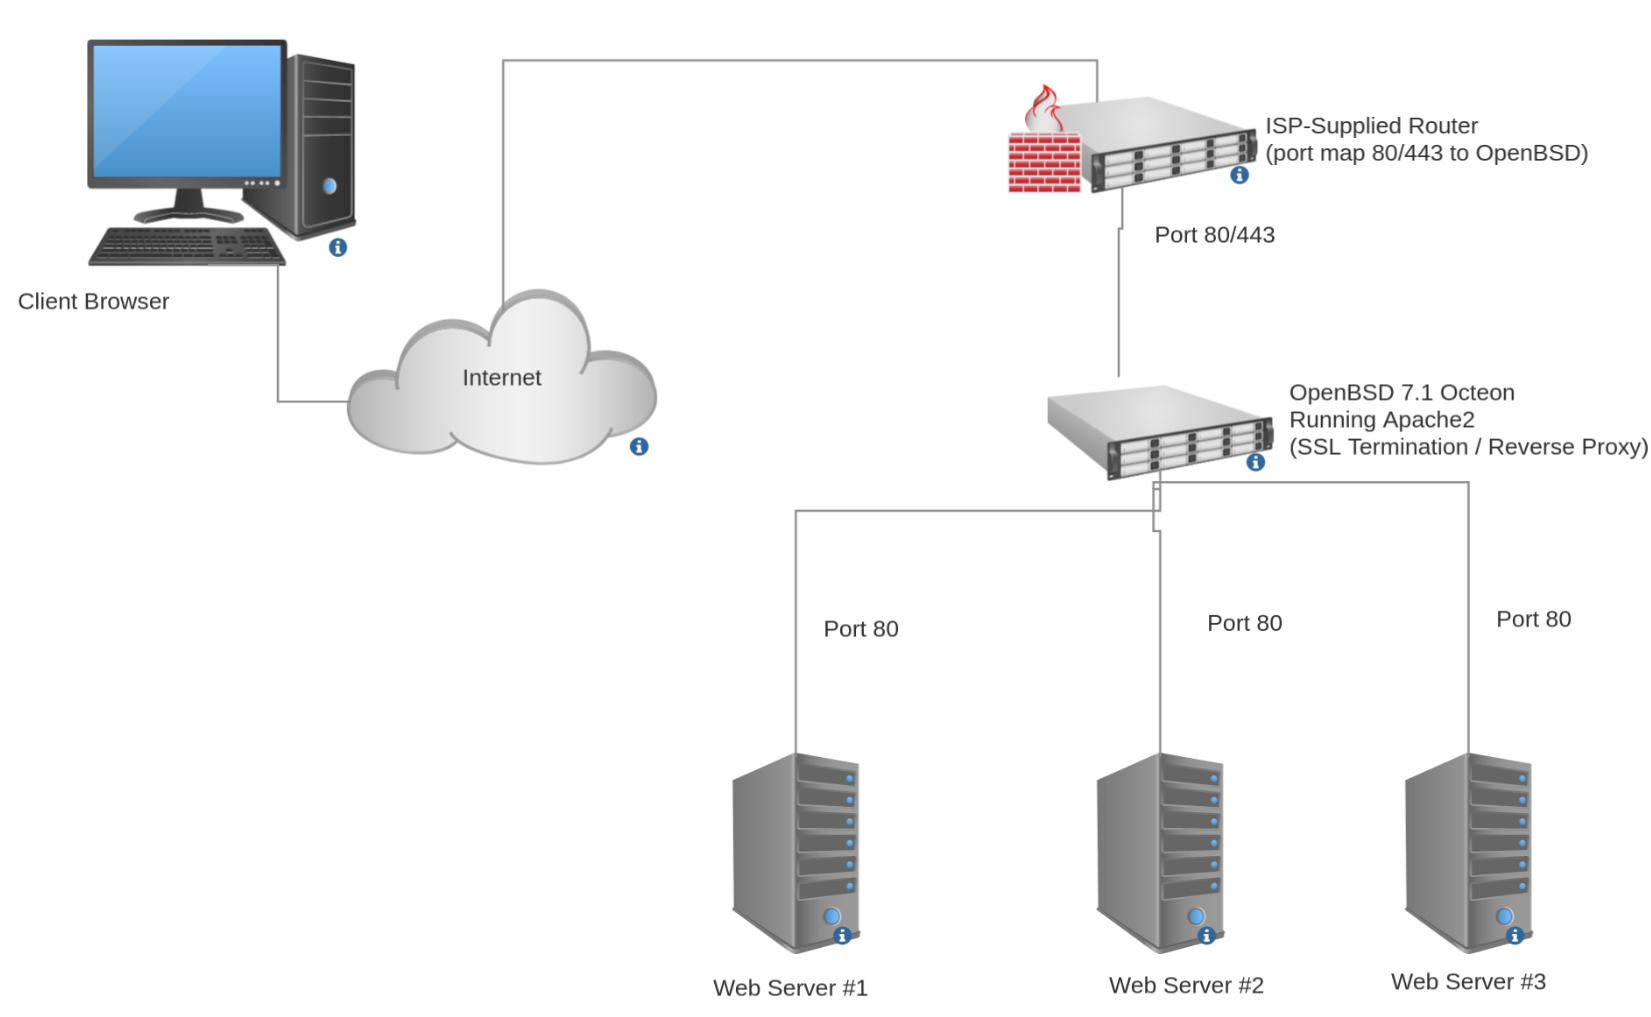
To pull this off, I have to first install and enable Apache2 on my OpenBSD Octeon Router:
Next, I have to get HTTPS certificates for my various sites. While I would have loved to have done this using certbot, I couldn’t because there was a C language library needed by Python3 to allow this that wasn’t available on the Octeon build (because my router doesn’t use and Intel/AMD CPU). I then tried using acme-client but found the configuration to be too challenging to pull off right away. Perhaps another blog post in the future. Anyhow, I used a Linux box and ran certbot to generate each of my certificates. I then wrote a little bash script to use scp to copy them to the right folder on my OpenBSD router and scheduled it with cron. Kickin’ it old school!
$ doas pkg_add apache2
$ doas rcctl disable httpd
$ doas rcctl enable apache2
$ doas rcctl start apache2
After that, it was time to write the necessary configuration in /etc/apache2/httpd2.conf for each of the sites. As you can see, this assumes that the SSL certificates are in the /etc/ssl/private directory on my OpenBSD router:
<VirtualHost *:80>
    ServerName www.example1.com
    ServerAlias www.example1.com

    RewriteEngine On
    RewriteCond %{HTTPS} off
    RewriteRule .* https://%{HTTP:Host}%{REQUEST_URI} [L,R=permanent]

    ProxyPass "/" "http://192.168.1.101/"
    ProxyPassReverse "/" "http://192.168.1.101"
    ProxyPreserveHost On
</VirtualHost>

<VirtualHost *:443>
    ServerName www.example1.com
    ServerAlias www.example1.com

    ProxyPass "/" "http://192.168.1.101/"
    ProxyPassReverse "/" "http://192.168.1.101"
    ProxyPreserveHost On

    SSLEngine On
    SSLCertificateFile /etc/ssl/private/www.example1.com/cert.pem
    SSLCertificateKeyFile /etc/ssl/private/www.example1.com/privkey.pem
    SSLCertificateChainFile /etc/ssl/private/www.example1.com/fullchain.pem

    SSLProxyEngine On

    <Location "/">
        SSLRequireSSL
        RequestHeader set X-Forwarded-Proto "https"
        RequestHeader set X-Forwarded-Ssl on
        RequestHeader set X-Url-Scheme https
        RequestHeader set X-Forwarded-Port "443"
    </Location>
</VirtualHost>
It is also necessary to further edit the /etc/apache2/http2.conf file to uncomment the “LoadModule” configuration lines for the services being used in the above configuration. The modules to load include ssl_module, proxy_module, proxy_connect_module, proxy_http_module, ssl_module, rewrite_module. After this, simply do an “rcctl restart apache2” and ensure that you were successful. If not, go back and double-check the configuration file.
Next, you will need to make sure that your pf firewall allows port 80 and 443 through so that your site can be reached from off of the OpenBSD machine. To do this, add the following to your /etc/pf.conf file:
# Allow serving of HTTP
pass in on { $wan } proto tcp from any to any port 80
# Allow serving of HTTPS
pass in on { $wan } proto tcp from any to any port 443
Reload the rules for pf using “$ doas pfctl -f /etc/pf.conf” and that step is done. You will also need to likely map ports 80 and 443 from your residential gateway (provided by your ISP) to send them to the OpenBSD router. At this point you should be able to hit your SSL protected site from outside of your network. I always test this by turning off the wifi on my cell phone and using it’s browser on the telco’s network. As you add more “internal” websites, simply duplicate those two sections above and restart your Apache2 daemon on the OpenBSD router.
What About Email?
This one turned out to be very, very interesting. And by that I mean really stinking hard! The basics of it weren’t that bad. Here, I was able to use the wonderful “relayd” service that is native to OpenBSD to take all of the traffic I receive for the various email communication ports and fan them out to the appropriate back-end servers.
At first, I thought I would have to create a separate server for each email domain I wanted to host. Each of those servers would have to have its own SMTP server and each would have to have its own IMAP server. Also, if I wanted to have webmail for a particular domain, I would have to set it up to be an additional pair of entries in the http/https configuration in the previous section.
However, when I started configuring the DNS entries for all of this, I realized the error in my thinking. I only had a single public IP address so I needed the moral equivalent of that reverse proxy magic that I built using Apache2 on my OpenBSD router. How does one do this in the world of SMTP and IMAP? Well, it turns out there is a solution called Server Name Indication (or SNI) that is supported by the major SMTP and IMAP services in the Linux world. Therefore, I elected to host my email on Linux. Perhaps I will do a future blog post on how I migrated this to OpenBSD?
First things first, I needed to set up the necessary DNS entries to ensure that not only will my mail get routed to me, but that it will be considered deliverable and not “spammy” in an way. These included the following entries for each domain:
A * 1.2.3.4 15 min TTL
A * 1.2.3.4 15 min TTL
A mail.example1.com 1.2.3.4 15 min TTL
MX @ 10 mail 15 min TTL
@ IN TXT "v=spf1 mx a -all"
_dmarc IN TXT="v=DMARC1;p=quarantine;rua=mailto:admin@example1.com"
mail._domainkey IN TXT "v=DKIM1; h=sha256; k=rsa ; p=*"
For the above, the “1.2.3.4” is your static IP address from your ISP and you obviously need to fill in bits with your domain name as well as the DKIM content represented by the p=* section in the last entry. Perhaps I’ll do a full setup post in the future on this topic.
After setting up DNS, you will then need to configure your mail server. I chose postfix for the SMTP server as it supports SNI and dovecot for the IMAP server for the same reason. Once that was done and I could access things securely from within my private network, I then set up relayd on my OpenBSD router:
$ doas rcctl enable relayd
$ doas rcctl start relayd
I then wrote the following configuration file in /etc/relayd.conf to map the necessary ports to the mail server:
ext_addr="192.168.1.2"  # private IP address of OpenBSD Router
mail_host="192.168.1.201" # private IP address of mail server

relay smtp {
    listen on $ext_addr port 25
    forward to $mail_host port 25
}

relay submission_tls {
    listen on $ext_addr port 465
    forward to $mail_host port 465
}

relay submission_starttls {
    listen on #ext_addr port 587
    forward to $mail_host port 587
}
25
relay imaps {
    listen on $ext_addr port 993
    forward to $mail_host port 993
}
After restarting relayd, we need to add some entries to /etc/pf.conf to ensure that the traffic actually gets through the OpenBSD firewall and hits relayd:
# Allow servicing of SMTP
pass in on { $wan } proto tcp from any to any port 25
# Allow servicing of Submission TLS
pass in on { $wan } proto tcp from any to any port 465
# Allow servicing of Submission startTLS
pass in on { $wan } proto tcp from any to any port 587
# Allow servicing of IMAPS
pass in on { $wan } proto tcp from any to any port 993
Now reload your pf rules with “$ doas pfctl -f /etc/pf.conf” and your machine should be relaying traffic. Finally, you will need to port map ports 24, 465, 587 and 993 on your residential gateway provided to you by your ISP and traffic should start flowing through. Test this from outside of your network and verify that everything is working as expected.
Conclusion
Using these techniques, you should be able to host any number of SSL enabled websites and properly secured email domains on private servers within your home network. This means that you can save some money by not having to use virtual servers in the cloud and also increase the privacy of your services because you physically control the servers themselves.
Don’t forget to back up your data from these servers and then store it somewhere offsite (preferably in two places) in an encrypted fashion. One thing the cloud does make simple is just checking a couple of checkboxes and you suddenly have snapshots of your virtual server stored offsite. You can never have too many backups.
Anyhow, I hope this was helpful for everyone!